Configuring NGINX on Ubuntu

This article forms part of a series of guides in which I intend to demonstrate how to configure a Linux web-server. The first thing you will obviously need while setting up a web server is the web-server itself sitting on top of your favorite Linux distribution such as Ubuntu, OpenSUSE or Fedora. I stress however, that we are not setting up a development server here but rather a full-fledged production server which anyone can connect to. Where you’ll be able to upload a website and vent yourself.
Among the various web-servers available out there (e.g So popular Apache Httd and NGINX, Ligthttd etc…) and the controversy the noobs are popping around them on Internet forums, I’ll spare myself the effort of explaining the differences so that you make good use of search engines. For the purpose of explaining how to setup a basic web server on a VPS that I’ll suppose you already own we are going to use NGINX, one of the most widely used web-server, on Ubuntu 16.10 (Yakkety).
Just a word
Ubuntu uses apt as its package manager, if you are running another distro make sure that are you using the corresponding commands for your package manager.
Installing NGINX
To install NGINX, you will need superuser access. To install the web-server with appropriate permission type the following commands:
sudo apt-get update
sudo apt-get install nginx
After NGINX is installed, you will need to check if your server’s firewall is not blocking the standard HTTP port 80 and HTTPS port 443. Type:
sudo ufw status
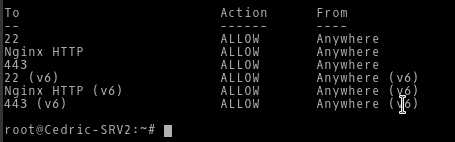
If port 80 and 443 are blocked then type the following:
sudo ufw allow ‘Nginx HTTP’
To enable port 443 for SSL type:
sudo ufw allow tcp/443
To check is your webserver is up and running type your server’s IP address onto your browser’s address bar. You should see something like this:
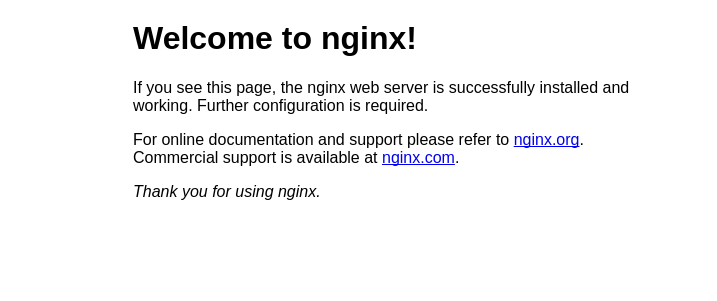
Congratulations, your web-server is installed successfully. Now let’s dirty our hands with some basic config.
Configuring NGINX (Basic)
Okie dokie! Let’s say you’ve got a domain name that you want to use with your newly-installed NGINX server. For instance, let’s assume your domain name is “mydomain.com” and you need to configure NGINX so that it knows what content to serve when someone enters this address into their browser.
So first thing first, here’s some location you need to remember:
“/var/www/html/” – this is where you are going to put all your web files and directories such as HTMLs, PHPs etc. Of course this is can be changed to whatever location you like but just keep in mind that this is the default location at least on newer Ubuntu installs otherwise it might be in “/usr/share/nginx/html” for older versions.
“/etc/nginx/sites-available” – this is the location of your websites’ configuration files
“/etc/nginx/sites-enabled” – the configurations of the websites currently being read by NGINX.
Yet another important thing: Don’t forget to port your domain to your server’s IP Address.
For NGINX to serve just the appropriate content when someones accesses “mydomain.com”, we need to create a configuration file for our domain in “/etc/nginx/sites-available/”. Let’s do that by copying the default configuration and save it as “mydomain”. Here’s the command:
sudo cp /etc/nginx/sites-available/default /etc/nginx/sites-available/mydomain
Now let’s edit the config file:
sudo nano /etc/nginx/sites-available/mydomain
In the config file locate the root statement and change it to:
root /var/www/html/mydomain;
Then locate the server_name statement and change appropriately to something like this:
server_name www.mydomain.com mydomain.com;
Now close and exit nano by pressing CTRL + X and hit “y” to save.
After adding a website’s configuration, make sure you never forget to link it in the sites-enabled directory so that NGINX enables it. Type the following to create a symlink to the config file:
sudo ln -s /etc/nginx/sites-available/mydomain /etc/nginx/sites-enabled/
Lastly, let’s restart NGINX:
sudo systemctl restart nginx
Uploading Website Content
Now that our server is configured we need to upload some content to it. To do that, either you set up an FTP Server or use wget to get your content from somewhere else. We don’t show how to do this here yet so use your search creativity.
However, you will notice that we redirected the root statement to a subdirectory of /var/www/html in the config file. So we will have to create a directory called “mydomain” within the html directory:
sudo mkdir /var/www/html/mydomain
Now you can upload all your domain to the newly created folder.
As a last step, after you’ve uploaded all your content, you will need to give NGINX read and write access over these files. We do that by giving those permission to the user www-data which is used specifically by web-servers.
sudo chown -R www-data:www-data /var/www/html/mydomain
sudo chmod -R 775 /var/www/html/mydomain
Conclusion
Phew! That was it. You now how a fully working website. Things however, doesn’t stop here. There are other things that you’ll probably need such as PHP, mysql and more. So stay tuned for other articles.

![[Event] Introduction to Linux & Free Open-Source Software](/content/images/size/w720/wordpress/intro-linux2-1.jpg)